管理 Tableau Desktop 和 Tableau Prep Builder 的许可证使用情况
- 版本 :2022.1 及更高版本
安装 Tableau Desktop 和 Tableau Prep Builder 后,您可能需要跟踪产品许可证的使用情况。如果您在具有基于登录名的许可证管理的环境中使用 Tableau Desktop 或 Tableau Prep Builder,则可以在 Tableau Server 管理视图中查看 Tableau Desktop 和 Tableau Prep Builder 许可证的使用情况。有关详细信息,请参阅基于登录名的许可证使用情况(链接在新窗口中打开). 如果您使用产品密钥激活 Tableau Desktop 或 Tableau Prep Builder,请查看本节中的文章,为您的产品配置许可证报告或使用。
配置 Tableau Desktop 许可证使用情况报告,以从 Tableau Desktop 的各个实例收集使用情况信息,并将该信息发送到您指定的 Tableau Server 实例。您可以使用收集的信息来帮助您管理组织中的 Tableau Desktop 许可证。有关如何跟踪服务器许可证使用情况的信息,请参阅查看服务器许可证在 Tableau Server 帮助中。
Tableau 提供以下工具来帮助您跟踪和管理组织中的许可和使用情况。
| 工具 | 描述 |
| 客户门户 | 这客户门户通过 Tableau 网站上的页面,您可以购买、管理和查看分配给用户的产品密钥的注册信息。您可以代表您的组织管理您的 Tableau 帐户,下载 Tableau Desktop 安装包,并与 Tableau 的技术支持团队打开和管理当前和之前的案例交互。 门户不提供详细的使用情况数据。但是,您可以根据门户中可用的用户注册记录来确定谁在您的组织中安装了 Tableau 安装。 |
| 桌面报告 | 对于 Tableau Desktop(版本 10.0 及更高版本),您可以配置 Tableau Desktop 报告,以向组织中运行的 Tableau Server 实例报告使用情况信息。此功能仅适用于使用产品密钥的客户,不适用于使用基于登录名的许可证管理的客户。 Tableau Desktop 报告从 Tableau Desktop 的各个实例收集使用情况信息,并将这些信息发送到 Tableau Server,您可以在其中使用管理视图来跟踪和报告使用情况。 通过将 Tableau Desktop 配置为报告使用情况信息,您还可以验证门户中显示的产品密钥注册对是否与组织中已激活的 Tableau Desktop-user 对匹配。有关详细信息,请参阅启用和配置 Tableau 桌面报告。有关如何跟踪服务器许可证使用情况的信息,请参阅查看服务器许可证在 Tableau Server 帮助中。 |
| 虚拟桌面支持 | 您可以将 Tableau Desktop(版本 10.5 及更高版本)配置为在预定的时间段后自动停用许可证。此功能旨在支持使用非持久性虚拟桌面的组织,这些虚拟桌面可能会频繁回收,从而导致新的激活请求。 当您将 Tableau Desktop 实例配置为自动激活返回时,如果回收虚拟机或重新映像计算机,则该虚拟机或计算机上的任何已激活许可证或基于登录名的许可证管理租约将在预设的时间段后自动返回,从而您可以选择激活其他计算机。 有关如何配置虚拟桌面支持的信息,请参阅配置虚拟机支持 |
| 基于登录名的许可证使用情况报告 | 您可以查看 Tableau Online 或 Tableau Server 基于登录名的许可证使用情况。该报告显示激活、正在使用的创建者席位、未使用的创建者席位以及上次使用创建者席位的时间。有关如何启用基于登录名的许可证管理的详细信息,请参阅基于登录名的许可证管理. |
启用和配置 Tableau 桌面报告
默认情况下,Tableau 桌面报告处于禁用状态。要使用该功能,您需要执行以下操作:
在 Tableau Server 上启用报告。
将 Tableau Desktop 安装配置为向一个或多个 Tableau Server 实例报告。
步骤 1:在 Tableau Server 上启用报表
A Tableau Server TSM administrator can enable reporting using the TSM web interface, or from a command line, using the TSM CLI. You only need to do this using one of the procedures listed below.
Use the TSM web interface
Open TSM in a browser:
https://Sign in to Tableau Services Manager Web UI in the Server help.
Click Notifications on the Configuration tab, and then click Events.
Under Server health monitoring, select the Enable Tableau Desktop License reporting box. This configures Tableau Server for Desktop Reporting.
Click Save Pending Changes after you've entered your configuration information.
Click Pending Changes at the top of the page:

Click Apply Changes and Restart.
Use the TSM CLI
To enable reporting on Tableau Server, use the following commands on each Tableau Server instance that Tableau Desktop will report to:tsm
tsm configuration set -k features.DesktopReporting -v true
tsm pending-changes apply
tsm restart
For more information about how to use , see tsmtsm Command Line Reference in the Tableau Server Help.
Step 2: Configure Desktop for reporting
You can configure Tableau Desktop for reporting license information in one of two ways:
During installation or reinstallation (Windows only)
For Tableau installations on Windows computers, you can use installer command properties to specify an instance of Tableau Server to report to and set a different reporting frequency interval.
The property defines one or more instances of Tableau Server where license reporting information is sent. To specify an instance of Tableau Server, use the URL that you would normally use to connect to the server, including the port, if it is not the default of port 80.
REPORTINGSERVERIf Tableau Server uses SSL you need to preface the URL with , otherwise use .
https://http://The property sets the interval in seconds that Tableau will use for reporting to the server or servers.
SCHEDULEREPORTINTERVAL
Example
The following command installs Tableau Desktop and configures it to report to two Tableau Server instances at a reporting interval of two hours.
One instance () is using the default port and is not using SSL. The other instance () uses SSL and default port 443.http://mytableauhttps://mytableau02
tableau-setup-std-x64.exe /quiet ACCEPTEULA=1 SCHEDULEREPORTINTERVAL=7200 REPORTINGSERVER="https://mytableau02,http://mytableau"
For more information about using command line properties, see Install Tableau Desktop and Tableau Prep Builder from the Command Line.
After installation
Add a Windows registry key () or a Mac file value () with the address of one or more Tableau Server instances where you want to send the license information.
ReportingServer.plistcom.tableau.ReportingServer.plistYou can configure the Tableau Desktop instance to send reporting information to up to six different servers. You can also edit the registry or .plist file to specify a non-default reporting frequency interval.
For more information, see Enable Tableau Desktop reporting after installation in this topic.
If you update the registry or .plist file after Tableau Desktop is installed, you need to restart Tableau Desktop for the changes to take effect.
Enable Tableau Desktop reporting after installation
If your organization has already deployed Tableau Desktop and wants to use Desktop reporting, you must update the registry key or file value on each computer where Tableau Desktop is installed..plist
Windows
As an administrator on the computer running Tableau Desktop, make a backup of the registry file before you make any changes to it.
Open the Registry Editor, and expand . Then edit the registry to create a new key named with these values:
HKEY_LOCAL_MACHINE\SOFTWARE\TableauReportingServerThe illustration below shows what the and keys looks like in the registry editor.
ServerScheduleReportIntervalName: Add a string value named .
ServerData: Add the URL or URLs of the Tableau Server instances that the Tableau Desktop instance will send reporting data to. Include the protocol ( or ) and the port number if needed. Separate multiple addresses with a comma (,). You can include up to six addresses. Any addresses after the sixth one are ignored.
httphttpsFor example, the following value configures Tableau Desktop to report to two Tableau Server instances. The first, , is configured for SSL and listens on the default port 443. The second, , doesn't use SSL and listens on the default port, 80.
Serverhttps://mytableau02http://mytableauhttps://mytableau02,http://mytableauName: Add a string value named .
ScheduleReportIntervalData: Add the interval, in seconds, at which you want Tableau Desktop to report to the server.
For example, a value of configures Tableau Desktop to report every four hours.
ScheduleReportInterval14400Restart Tableau so the changes take effect.

Mac
Update the .plist file from the /Library/Preferences
Make a backup of the file before you make any changes to it.
.plistMake the location visible by running the following command:
/Library/Preferencesdefaults write com.apple.finder AppleShowAllFiles YESCreate a file in with a key set to the address of the server you want the Tableau Desktop instance to report to, and a key set to the frequency in seconds that Tableau Desktop should report to the servers.
com.tableau.ReportingServer.plist/Library/PreferencesServerscheduleReportIntervalExample:
A file that's configured to send information every four hours to two servers, and .
.plisthttps://mytableau02http://mytableau<?xml version="1.0" encoding="UTF-8"?> <!DOCTYPE plist PUBLIC "-//Apple//DTD PLIST 1.0//EN" "http://www.apple.com/DTDs/PropertyList-1.0.dtd"> <plist version="1.0"> <dict> <key>Server</key> <string>https://mytableau02,http://mytableau</string> <key>scheduleReportInterval</key> <string>14400</string> </dict> </plist>
Restart Tableau so the changes take effect.
Update the .plist file from the command line
Make a backup of the file before you make any changes to it.
.plistOpen a Terminal prompt as an Administrator and use the following commands to set the address of the server you want the Tableau Desktop instance to report to, and a -string to set the frequency in seconds that Tableau Desktop should report to the servers.
scheduleReportIntervalExample:
Send information every four hours to two servers, and :
https://mytableau02http://mytableausudo defaults write /Library/Preferences/com.tableau.ReportingServer Server -string https://mytableau02,http://mytableau"sudo defaults write /Library/Preferences/com.tableau.ReportingServer scheduleReportInterval -string "14400"Important: Do not copy and paste the above examples into the Terminal. Type them in manually to avoid getting an error.
Restart Tableau so the changes take effect.
View Tableau Desktop usage and expiration information on Tableau Server
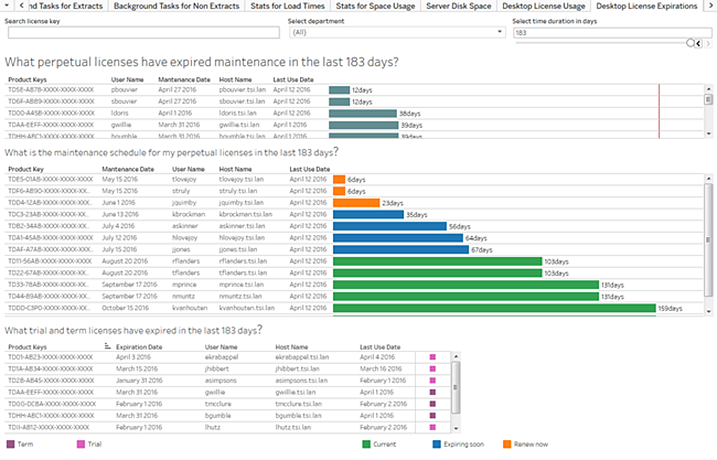
After you've configured instances of Tableau Desktop for reporting, it sends usage information to Tableau Server. If you've enabled reporting on Tableau Server, you can use the Tableau Desktop License Usage administrative view see license usage data.

The Tableau Desktop License Usage administrative view can answer questions such as:
What types of licenses are installed in your organization.
Which users have Tableau licenses.
Which licenses are used most often and least often.
Whether trial licenses need to be converted to paid licenses.
Which licenses are expired or might soon expire.
When maintenance renewals are due in your organization.
You can also use the administrative view to identify heavy usage, and you can determine whether specific users have not been using Tableau and might need additional training.
For more information, see Desktop License Usage and Desktop License Expiration in the Tableau Server Help.
View login-based license usage
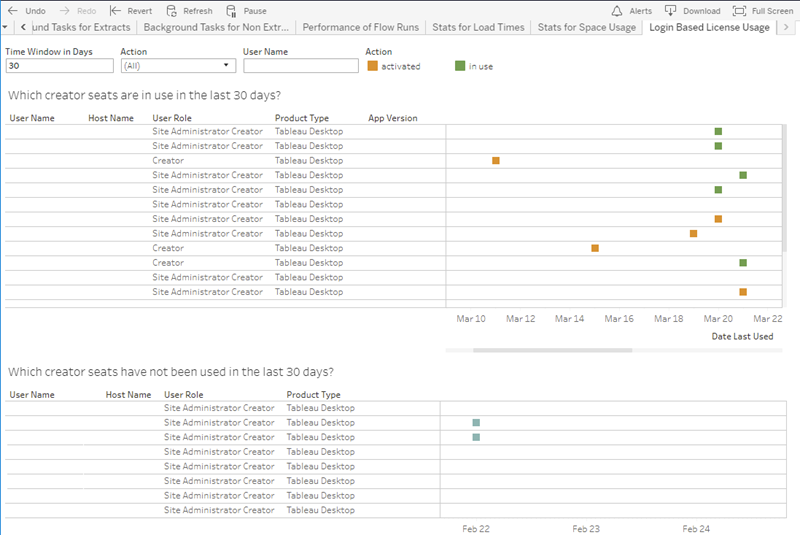
You can view login-based license usage for Tableau Online or Tableau Server. The report shows users, hosts, user role, product, version, activations, Creator seats in use, Creator seats not in use, and when a Creator seat was last used. You can view data for the past 30 days up to a maximum of 183 days.
To view the Login-based license management License Usage administrative view:
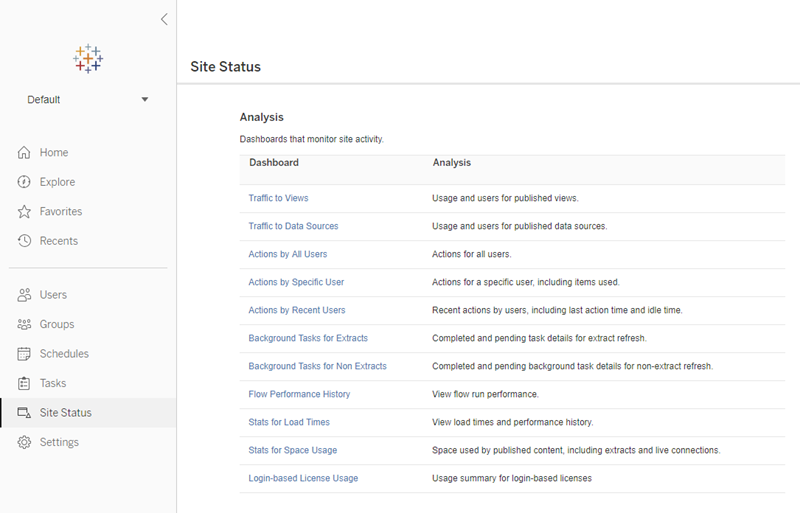
In Tableau Online or Tableau Server, in the navigation pane, click Site Status.

On the Site Status page, click Login-based License Usage.
Optional. On the report screen, you can change the time window to show when seats were last used, filter on actions, filter on user name, and sort by columns.


 400 998 0226
 Tableau


 Tableau
 Minitab


 Alteryx


 Neo4j
Neo4j


 Talend


 IM
IM


 华为云
华为云 腾讯云
腾讯云 IT/安全
IT/安全


